Borehole drilling, Soil investigation, Geophysical, Environmental, Oil and Gas

Tag: sump pipe

Manual Water Borehole Drilling Design and Construction

To achieve a good well design, a drilling log should be completed, a drilling log during the actual drilling process, from the drilling logs, the exact depth and length of the well screen, the depth and thickness of the gravel pack and sanitary seal can be determined.

Drilling log

Borehole diameter

The internal diameter of the PVC well casing is selected to fit the outer diameter of the pump that is going to be installed. The drilled diameter of the borehole in turn depends on the outer diameter of the PVC well casing. For the diameter of the borehole, it is important to realize the following:

The drilled diameter of the borehole should be at least 2-inch larger than the outer diameter of the PVC well casing to be able to place the gravel pack and sanitary seal. If this rule is not applied and the space between the PVC well casing and the borehole wall is too small, it is almost impossible to place the gravel pack and sanitary seal at the correct depth. Furthermore, the backfill may get ‘stuck’ on its way down (this is called ‘bridging’) and end up in the wrong position.

Borehole depth

When the final depth for the bottom of the well-screen in the aquifer is reached, an additional two meter should be drilled. This is to allow for fine soil particles, suspended (mixed with the water) in the borehole, to settle prior to and during the installation of the well-screen and casing, by doing so, the determined well-screen depth can be maintained, and to accommodate a sump.

Drilling the borehole to depth

Finally, before the drilling pipes are lifted, the fluid used to drill borehole should be flushed with clean water to remove all fine particles that are suspended in the hole. If this is not done, the particles will settle at the bottom of the well influencing the final installation depth or enter the well-screen during the installation of the well casing.

Materials: PVC well-screen and casing

Several different PVC pipes exist, varying from cheap drain pipes to expensive, high class, slotted well screens and casing pipes.

For a potable water well use by a single household or a few households a deeper hole may be needed. In this case a self-slotted 4-inch PVC pipe can be used.

In large water projects (for Governments or NGOs) for communal potable water wells, equipped with a high horse power submersible pump, a deeper hole is needed 5 to 6-inch standard factory slotted PVC well casing pipes are often required (to maximize yield, to ensure high construction quality, and to accommodate the pump). These wells will be significantly more expensive, but of better quality.

PVC Well screen and Casing

Slots are the openings in the well-screen which allow groundwater to flow into the well. In theory the slot size (width) should be smaller than the mean size of the soil particles. However, in some countries only 1 factory-made slot size (1mm) is available. For low-cost wells, one can make the slots by hand using a hacksaw.

Sump

To increase the lifetime of the well-screen, it is advised to attach a 1-meter sump at the bottom of the well-screen, into which any particles entering the well screen from the aquifer can settle, without blocking the well-screen and pump.

The sump simply consists of a 1-meter plain PVC pipe, which is closed at the bottom end. To close the bottom of the sump a factory-made wooden or PVC cap can be inserted. Alternatively, the bottom end of the sump pipe can also easily be closed by some cutting and bending. Make 4 cuts in the bottom part of the sump pipe and heat the pipe end. Fold the four parts inside and allow the parts to cool (see photo).

Sump

Alternatively cut out 6-8 triangular parts. The remaining parts can be bent together to a point. Making a point will reduce the risk of ‘scraping’ the borehole wall when the well-screen is lowered into the borehole. To completely seal the bottom of the sump 10 cm of cement mortar should be poured in the sump.

Pipe joints

Casing and well-screen pipes are usually joined by glued sockets. The more expensive purpose-made casings and well-screens with a wall thickness of at least 5 mm are threaded. When the pipes are glued together, it is very important to clean and roughen both ends, the inside of the socket and the outside of the pipe to be glued. Then, put sufficient glue all around on both ends and put the pipes together in one move.

PVC Pipe: Threaded and Socket type

Gravel pack

The gravel pack fills the space between the aquifer (sand particles) and the well screen preventing the wall of the hole from collapsing on to the well-screen and may serve to filter some of the fine sand particles from entering the well.

The gravel should consist of a grain size (generally 1.5 – 3mm) which is just larger than, and no more than twice to three times, the slot size of the well-screen. Good size gravel looks more like coarse sand, rather than gravel. The grains are best when round in shape. Such material can often be found on river beds or lake shores. The best way to prepare suitable gravel is using maximum and minimum sized sieves (grains which are too small or too big are sieved out).

Gravel pack

Sanitary seal

It is essential to install a sanitary seal if the well needs to yield good quality water. The sanitary seal can consist of cement-water mixture (cement grout).

The water and cement are mixed until a thick slurry is created (26 liters of water to one 50 kg bag of cement will make about 33 liters of cement grout). If cement grout is used as a sanitary seal, first a half meter of clay should be back filled on top of the gravel pack to prevent the grout from penetrating the gravel pack.

Sanitary seal

Water Borehole Construction

Step 1, Preparations

Prepare all materials needed for the installation and backfilling. Measure out the effective length of the PVC pipes and cut the last pipe to a length, allowing 1 meter to be left above ground level, after installation. Number the pipes in order of installation.

Centralization of the well screen

To prevent the slots from becoming blocked with clay due to scraping of the well screen against the borehole wall during installation, the well-screen should be centralized. Centralizing the well-screen in the borehole also allows the gravel pack to settle equally around the screen, leaving at least 1-inch of gravel all around the well-screen. Centralization can be achieved by attaching spacer rings or centralizers with an interval of every 3 meter around the well-screen. The spacer rings can be made of PVC rings, which can be attached on 4 sides around the well

Step 2, Installation of the PVC pipes

A practical method of lowering the PVC pipes into the borehole is to use a rope (see picture). One end of the rope is attached to the drill rig and the other end is wrapped three times around the pipe to form a self-closing loop. The rope is used to prevent the casing and screen slipping into the borehole while adding a new length of pipe. Install all the prepared pipes, and leave 1 meter (see step 1) of pipe above ground level so that the well-screen is placed at the correct depth.

Casing Installation

Step 3, Cleaning and flushing the well-screen

When the well-screen has been installed at the correct depth, the pipes and screen should be flushed in the case of fluid drilled boreholes. Pour water into the PVC pipes and allow the dirty water to overflow out of the borehole. If the added water only enters the well slowly (or not at all), this could indicate blockage of the well-screen slots by clay or fine material from the borehole wall. Extra water pressure in the casing and well-screen should then be created by adding a plunger or surge block (or simply a plug of cloth), which is then moved up and down in the casing. Repeat this process until the water directly flows away when added. Continue flushing with clean water until the water which is coming out of the borehole is clean. Only then the gravel pack should be installed.

Cleaning Screens

Step 4, Installation of the gravel pack

The gravel pack is now poured in the annular space around the pipe. At the same time the PVC pipe is moved from side to side to guarantee an easy passage for the gravel down to the screen. Pour in the gravel slowly, to prevent bridging (gravel getting stuck at the wrong level). Use the measurement tape or tool to measure the depth to the top of the gravel and fill to 1-2 meter above the top of the well-screen.

In fluid drilled holes, water will overflow from the PVC casing pipe, as the gravel is dropped around the well-screen. Water will stop overflowing the PVC casing pipe when the entire length of the well-screen has been backfilled.

Gravel Pack Installation

Step 5, Installation of the sanitary seal

When the gravel pack has settled to the right depth (always measure!), the sanitary seal can be installed Prepare the cement grout and pour it into the borehole in the same way (if cement grout is used for the sanitary seal remember to use clay for the first half meter on top of the gravel pack!) Measure to ensure the sanitary seal was installed at the right depth.

Step 6, Filling the annular space

The rest of the annular space is filled up by cuttings and cement grout (see below). Always pour in the material slowly, while moving the casing to prevent bridging of the material.

Step 7, Installation of the top seal

A sanitary top seal of 3-5m thickness should be placed from 3-5m below ground to the surface. The top seal is usually made of cement grout.

Top seal and grouting

Step 8, Well development

‘Well development’ is necessary to maximize the yield of the well and optimize the filter capacity of the gravel pack. This is achieved by removing the fines and drilling fluid additives, and settlement of the gravel pack.

After drilling some of the fines and drilling fluid additives remain behind in the borehole and are blocking the pores of the surrounding aquifer and the new installed gravel pack. After they have been removed by well development the water will be able to move freely from the aquifer to the well screen. During well development also the gravel pack will settle and become more compacted, ensuring that there are no large voids into which aquifer material (sand) could later collapse. The settled gravel pack will filter out some of the fines from the aquifer. During flushing of the well-screen and the borehole, already some of the fine particles and drilling fluid additives were removed. However, normally this first well development is not enough and more extensive development needs to be carried out after completing the installation process. The remainder of well development takes place after the backfill has been placed and the cement grout of the sanitary seal has hardened (this hardening process takes at least 24 hours).

Several techniques are available for well development, The most effective technique is airlifting: Airlifting is a very suitable development tool, by which high flow rates and shock waves can be established with a compressor.

Air lifting with compressor

Step 9, Construction of the head works and Well cap.

Finally the head works and well cap should be installed. This apron will prevent surface water and contamination to flow into the borehole directly.

Well head or Cap

Talk to us for your upcoming project in Water Borehole Drilling

Geodata Evaluation & Drilling LTD. offers water borehole drilling services. Let us handle the project for you. contact us at www.geodatadrilling.com Phone: +234 8037055441

Drilling logs in Water Borehole Drilling

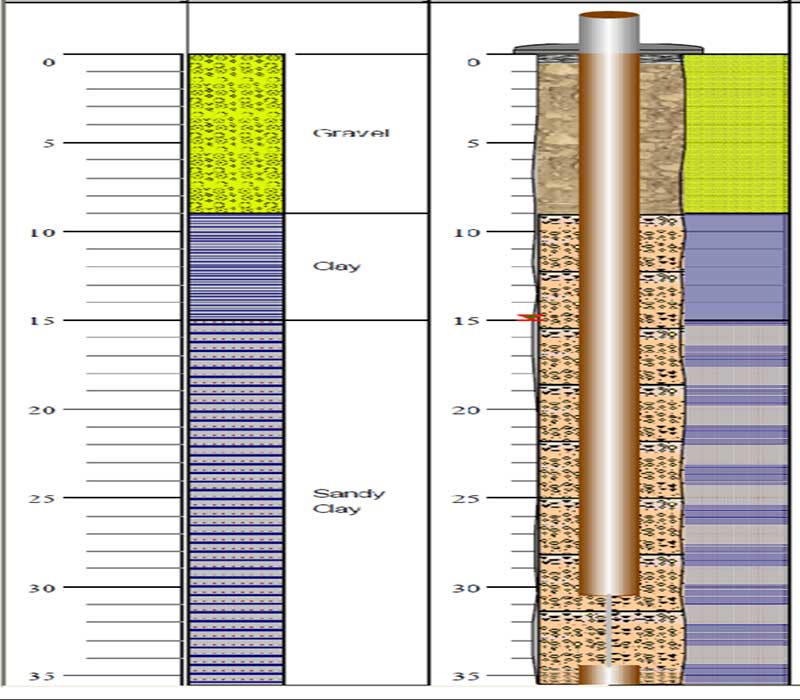
The Purpose of drilling logs

In construction of borehole with a good yield of clear and clean water which is free of contaminants. A Drilled log is needed to determine the depth or location of aquifers or permeable interval for screen installation, the location of impermeable layers, location of sanitary seal above the gravel pack (which surrounds the well- screen)

A drilling log is a written record of the geological formations (soil layers) drilled, according to depth. Soil samples should be taken at regular depths (e.g. every meter) and described during the drilling process. The soil description is then recorded in the form of a drilling log. The drilling log will help to determine:

  • The right aquifer for installation of the well-screen
  • Depth and length of the well-screen
  • Depth and thickness of the gravel pack
  • Location of the sanitary seal

Hydro geological database information

Besides the direct use of drilling logs in the field, drilling logs are also very important to record the hydro geological information of the drill site. For example, if at a later stage other wells have to be drilled in the same area, it is very useful for the drilling team to know the geology, depth of the water table and likely total drilling depth. Previous drilling logs are an essential source of information for these purposes, before the new drilling starts. This information could be important for the choice of the drilling equipment. The drilling logs can be kept together in a file, which is called a database. By taking care to record and preserve good drilling logs, the drilling team will present itself as a professional and skilled team to their clients.

Taking soil sample

The first step in making a drilling log, is to take representative samples of the soil (geological formations) encountered  in drilling. This means: the sample should be a pure piece of the layer that is being drilled at the moment of sampling (avoiding mixing the sample with soil from other layers!). Samples should be taken every meter and/or every time the formation (soil) type changes. The samples should be put on a plastic sheet (write down the depth if the sample is not immediately described), away from the drilling activities. Then described and recorded on the drilling log with the depth at which the soil sample was taken.

DRILLING DEPTH

The final drilling depth is reached when at least 4-6 meter has been drilled into a water bearing permeable sand or gravel layer. It is then recommended to drill two extra meters for installation of the sump which is  a reservoir for particles in the borehole to settle down during the well casing installation process.

FILLING IN THE DRILLING LOGS

Drilling Log

Step 1

Describe samples and write down the depth, name and characteristics  on the drilling log.

Step 2

Then, especially important for those who can not write, hatch the formation column and show  the difference between permeable, semi permeable and impermeable layers by different hatching.

Step 3

Now the well-screen length and depth can be determined.

Step 4

Once the well-screen and PVC casing are hatched in the first column, the exact depths for the annular back fill (i.e. gravel pack, sanitary seal and cuttings) can be determined by use of the drawings on the drilling log.

To resume: filling in the drilling logs is a 4 step process:

  • Describe the samples and depth
  • Indicate permeable and impermeable layers
  • Mark the casing, screen and sump in the column “PVC pipe”
  • Mark the back filling and sanitary seal(s) in the column “back fill”

Groundwater level

When a borehole is drilled ‘dry’, meaning without the use of drilling fluid or With a fluid-drilled where  borehole is kept full of water to maintain water pressure,  the depth of the water table can easily be determined during drilling. The soil that comes out during drilling will be wet when the groundwater level is reached.

DETERMINE THE DEPTH OF THE WELL SCREEN AND BACK FILLING

Once the soil descriptions are hatched on the drilling log, the visible information can be used to determine the exact depth of the well-screen and annular back fill.

Screen & PVC Casing

Well-screen, position and length

The well-screen usually does not exceed a length of 6 meter,  for manually drilled boreholes. Fine materials are often present in the extreme upper and lower parts of an aquifer. Also thin clay layers might exist in the aquifer. To prevent the fines (which may cause turbidity and pump damage) from entering the well-screen it is important NOT to install the well screen at the same level as these fines in the aquifer. In other words; be sure that the whole screen length is installed in a permeable layer, consisting of sand or gravel! To achieve this in some cases the screen length  might be less than 6 meters  (but should generally never be less than 3 meter. Although carefully taken, the exact depth of origin of the soil samples might not always be accurate. To avoid fines from entering, it is wise to install the well screen and back fill with a safety margin of at least 1 meter.

Sump

Sump

After the installation and during the use of a well, some soil particles may still enter the well-screen. The bigger particles (which can cause damage to the pump) settle down to the bottom of the well by gravity. To prevent loss of well-screen surface area, a sump of 1-2 meter in length, with a closed bottom end is attached to the well-screen.

Thickness of the gravel pack

Once the well-screen position is recorded (hatched) on the drilling log, the position and thickness of the gravel pack can be determined. The annulus (open space) around the well-screen is filled with coarse sand or fine gravel of specific size (gravel pack), up to about 1-2 meter above the top of the well-screen. The extra meters are necessary because during the development of the well, the gravel pack will settle (and shrink). It is therefore good practice to include at least 1-2 meter safety margin above the well-screen during installation of the gravel pack.

Thickness of the sanitary seal

When an impermeable layer is drilled through, it is advised to seal (close) again that whole impermeable layer with clay (bentonite) or cement. To be sure the layer is sealed properly, the thickness of this seal should be at least 3-5 meter. If no impermeable layer was found, and the well is thus placed in the first aquifer, the sanitary seal should be installed directly on top of the gravel pack (1-2 meter above the well-screen) and should have a thickness of at least 5 meter.

Cuttings

On top of the sanitary seal, backfilling of the drilling hole is done by using the cuttings (soil which was drilled up during the drilling process).

Sanitary top-seal

Also a sanitary top-seal of 3-5m thickness should be placed from 3-5m below  ground to the surface. it is essential to install a sanitary seal if the well needs to yield good quality water. The sanitary seal can consist of cement or bentonite pellets (the volume of the bentonite pellets will increase many times when it gets wet, and so it seals the hole by expanding). Also natural swelling clays can be used, but they are more difficult to handle than processed bentonite. In many countries bentonite pellets are expensive. In these cases it is recommended to use a cement-water mixture (cement grout). The water and cement are mixed until a thick slurry is created (26 liters of water to one 50 kg bag of cement will make about 33 liters of cement grout). If cement grout is used as a sanitary seal, first a half meter of clay should be back filled on top of the gravel pack to prevent the grout from penetrating the gravel pack.

Talk to us for your upcoming project in Water Borehole Drilling

Geodata Evaluation & Drilling LTD. offers water borehole drilling services. Let us handle the project for you. contact us at www.geodatadrilling.com Phone: +234 8037055441

© 2023 geodata & Drilling

Theme by Anders NorenUp ↑