Drilling logs in Water Borehole Drilling
The Purpose of drilling logs
In construction of borehole with a good yield of clear and clean water which is free of contaminants. A Drilled log is needed to determine the depth or location of aquifers or permeable interval for screen installation, the location of impermeable layers, location of sanitary seal above the gravel pack (which surrounds the well- screen)
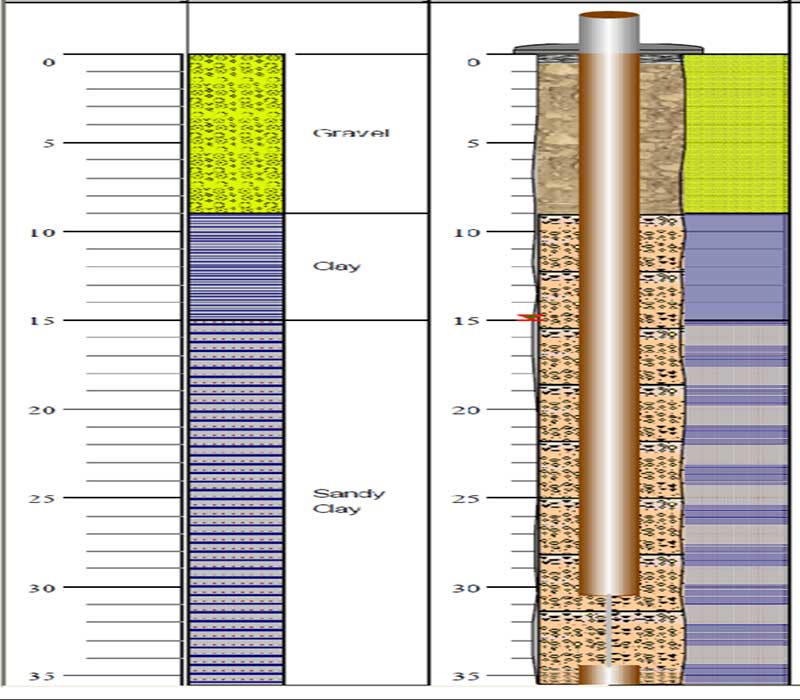
A drilling log is a written record of the geological formations (soil layers) drilled, according to depth. Soil samples should be taken at regular depths (e.g. every meter) and described during the drilling process. The soil description is then recorded in the form of a drilling log. The drilling log will help to determine:
- The right aquifer for installation of the well-screen
- Depth and length of the well-screen
- Depth and thickness of the gravel pack
- Location of the sanitary seal
Hydro geological database information
Besides the direct use of drilling logs in the field, drilling logs are also very important to record the hydro geological information of the drill site. For example, if at a later stage other wells have to be drilled in the same area, it is very useful for the drilling team to know the geology, depth of the water table and likely total drilling depth. Previous drilling logs are an essential source of information for these purposes, before the new drilling starts. This information could be important for the choice of the drilling equipment. The drilling logs can be kept together in a file, which is called a database. By taking care to record and preserve good drilling logs, the drilling team will present itself as a professional and skilled team to their clients.
Taking soil sample
The first step in making a drilling log, is to take representative samples of the soil (geological formations) encountered in drilling. This means: the sample should be a pure piece of the layer that is being drilled at the moment of sampling (avoiding mixing the sample with soil from other layers!). Samples should be taken every meter and/or every time the formation (soil) type changes. The samples should be put on a plastic sheet (write down the depth if the sample is not immediately described), away from the drilling activities. Then described and recorded on the drilling log with the depth at which the soil sample was taken.
DRILLING DEPTH
The final drilling depth is reached when at least 4-6 meter has been drilled into a water bearing permeable sand or gravel layer. It is then recommended to drill two extra meters for installation of the sump which is a reservoir for particles in the borehole to settle down during the well casing installation process.
FILLING IN THE DRILLING LOGS
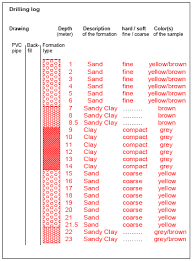
Step 1
Describe samples and write down the depth, name and characteristics on the drilling log.
Step 2
Then, especially important for those who can not write, hatch the formation column and show the difference between permeable, semi permeable and impermeable layers by different hatching.
Step 3
Now the well-screen length and depth can be determined.
Step 4
Once the well-screen and PVC casing are hatched in the first column, the exact depths for the annular back fill (i.e. gravel pack, sanitary seal and cuttings) can be determined by use of the drawings on the drilling log.
To resume: filling in the drilling logs is a 4 step process:
- Describe the samples and depth
- Indicate permeable and impermeable layers
- Mark the casing, screen and sump in the column “PVC pipe”
- Mark the back filling and sanitary seal(s) in the column “back fill”
Groundwater level
When a borehole is drilled ‘dry’, meaning without the use of drilling fluid or With a fluid-drilled where borehole is kept full of water to maintain water pressure, the depth of the water table can easily be determined during drilling. The soil that comes out during drilling will be wet when the groundwater level is reached.
DETERMINE THE DEPTH OF THE WELL SCREEN AND BACK FILLING
Once the soil descriptions are hatched on the drilling log, the visible information can be used to determine the exact depth of the well-screen and annular back fill.
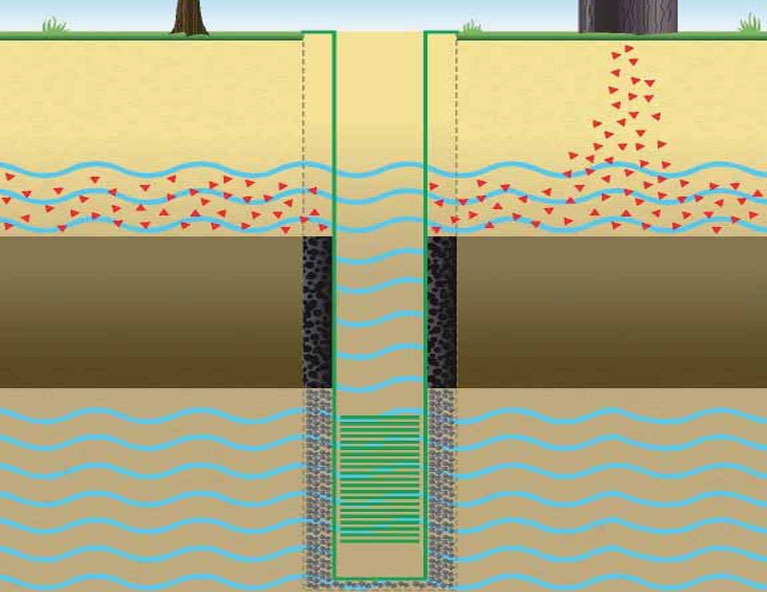
Well-screen, position and length
The well-screen usually does not exceed a length of 6 meter, for manually drilled boreholes. Fine materials are often present in the extreme upper and lower parts of an aquifer. Also thin clay layers might exist in the aquifer. To prevent the fines (which may cause turbidity and pump damage) from entering the well-screen it is important NOT to install the well screen at the same level as these fines in the aquifer. In other words; be sure that the whole screen length is installed in a permeable layer, consisting of sand or gravel! To achieve this in some cases the screen length might be less than 6 meters (but should generally never be less than 3 meter. Although carefully taken, the exact depth of origin of the soil samples might not always be accurate. To avoid fines from entering, it is wise to install the well screen and back fill with a safety margin of at least 1 meter.
Sump

After the installation and during the use of a well, some soil particles may still enter the well-screen. The bigger particles (which can cause damage to the pump) settle down to the bottom of the well by gravity. To prevent loss of well-screen surface area, a sump of 1-2 meter in length, with a closed bottom end is attached to the well-screen.
Thickness of the gravel pack
Once the well-screen position is recorded (hatched) on the drilling log, the position and thickness of the gravel pack can be determined. The annulus (open space) around the well-screen is filled with coarse sand or fine gravel of specific size (gravel pack), up to about 1-2 meter above the top of the well-screen. The extra meters are necessary because during the development of the well, the gravel pack will settle (and shrink). It is therefore good practice to include at least 1-2 meter safety margin above the well-screen during installation of the gravel pack.
Thickness of the sanitary seal
When an impermeable layer is drilled through, it is advised to seal (close) again that whole impermeable layer with clay (bentonite) or cement. To be sure the layer is sealed properly, the thickness of this seal should be at least 3-5 meter. If no impermeable layer was found, and the well is thus placed in the first aquifer, the sanitary seal should be installed directly on top of the gravel pack (1-2 meter above the well-screen) and should have a thickness of at least 5 meter.
Cuttings
On top of the sanitary seal, backfilling of the drilling hole is done by using the cuttings (soil which was drilled up during the drilling process).
Sanitary top-seal
Also a sanitary top-seal of 3-5m thickness should be placed from 3-5m below ground to the surface. it is essential to install a sanitary seal if the well needs to yield good quality water. The sanitary seal can consist of cement or bentonite pellets (the volume of the bentonite pellets will increase many times when it gets wet, and so it seals the hole by expanding). Also natural swelling clays can be used, but they are more difficult to handle than processed bentonite. In many countries bentonite pellets are expensive. In these cases it is recommended to use a cement-water mixture (cement grout). The water and cement are mixed until a thick slurry is created (26 liters of water to one 50 kg bag of cement will make about 33 liters of cement grout). If cement grout is used as a sanitary seal, first a half meter of clay should be back filled on top of the gravel pack to prevent the grout from penetrating the gravel pack.
Talk to us for your upcoming project in Water Borehole Drilling
Geodata Evaluation & Drilling LTD. offers water borehole drilling services. Let us handle the project for you. contact us at www.geodatadrilling.com Phone: +234 8037055441