Systeme.io: The Game-Changing Sales Funnel Builder You Need To Know About

Systeme.io is a powerhouse sales funnel builder tools tailor-made for the modern entrepreneur. It simplifies the complexities of managing an online presence, covering sales funnel builder, email marketing, blogging, and seamless financial transactions.

What is systeme.io?
Systeme.io is a versatile platform designed to help start and manage online businesses. It provides an all-in-one solution for different aspects of a business.
What is systeme.io used for?
Its functionalities are diverse:
- Email Marketing: Streamlined email campaigns to engage audiences.
- Sales Funnel Builder: Constructing a coherent path to drive sales.
- Blog and Website Development: Facilitating the inception and management of engaging blogs.
- Automating Business Processes: Simplifying and expediting repetitive tasks.
- Affiliate Program Management: Enabling the creation and supervision of affiliate programs.
- Digital Content Creation: Crafting and delivering digital courses and webinars.
Systeme.io Pros and Cons
Advantages:
- A generous free plan ideal for startups.
- Unlimited storage across all subscription tiers.
- You can easily create and run a blog by yourself
- Customizable automation rules
- Provide A/B testing to see which page performs better
- Integration with popular payment apps like PayPal and Stripe ensures smooth transactions.
Limitations:
- One-on-one coaching only accessible on the highest-tier plan.
- The free plan caters well to initial startup phases but might outgrow small businesses.
Is Systeme.io Free? Exploring Systeme.io’s Pricing
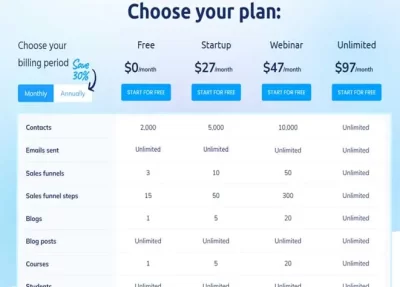
Systeme.io’s pricing structure caters to diverse business sizes:
Free
A generous free plan suits startups with its seamless integration and limited features.
Automation rules, A/B tests, and email campaigns are all restricted to only one, and you don’t get any migration support. That said, as long as you sell only a couple of products, this plan will suffice
Start up
Ideal for businesses looking to scale, offering expanded perks like custom domains and increased funnel and blog creation capacity.
Webinar
Catering to midsize businesses with substantial customer databases and extended automation capabilities.
Unlimited
Tailored for established enterprises with comprehensive features and added support services like migration assistance and one-on-one coaching.
This platform offers a grace period to test its capabilities, with a 30-day money-back guarantee for unsatisfied customers. It allows effortless upgrading of plans but requires contacting customer support for downgrades.
Is Systeme.io Legitimate? A Look at Systeme Reviews
Reviews from reputable platforms like Trustpilot and G2 affirm Systeme.io’s credibility, boasting high ratings and positive testimonials. Users appreciate its user-friendly interface, cost-effectiveness, and responsive customer support, although some concerns arise from unaddressed issues in a few cases.
An In-Depth Look at Systeme.io’s Features
Systeme.io offers a wide range of features that are important for businesses.
Email Marketing
Allows bulk emailing and scheduling, employing predesigned templates for efficient communication.
Of course, the main benefit of using emails for brand awareness is that you can communicate with a broad range of target audiences at the same time.
To save time, you can use one of Systeme.io’s predesigned templates and then send it to your entire contact list at once — which is great, whether for weekly emails, welcome emails, or an email campaign.
Once the email is ready, you can also schedule it for a time in the future instead of sending it immediately.
Blogging
Simplify your blog creation and management with Systeme.io. No coding knowledge needed. Easily categorize and create posts. Customize your page layout, posts, and elements directly from the Systeme.io dashboard. Create separate categories for different topics, like “Fashion,” “Fitness,” and “Recipes” for a lifestyle blog.
Adding new posts is a breeze. Customize your content by adding widgets such as page footers, pricing plans, and testimonials without any coding. Simply drag and drop these widgets from the “Blocks” tab in the left-side menu and adjust their position on the page.
Setting Up an Online Store
Effortlessly create and manage online stores, handling physical and digital product listings and order management.
You just need to select widgets from the side that you want to include and arrange these elements with your cursor, which makes it no less than any dedicated top website builder
You can also sell digital products such as Systeme.io courses and coupons, and depending on your plan, you can even add custom domains to your product. This will make it easier for your customers to recognize your brand.
Once your products are listed and the store is up and running, you can use Systeme.io to manage your orders. For this, you’ll have to click on the “Orders” option from the top header menu.
Click on “All Orders” for the drop-down menu that lets you choose to see fulfilled orders or unfulfilled ones. You can also filter these to see a specific order type and even those placed on a certain date
Business Automation
Customizable rules facilitate automated processes, enhancing customer interaction and satisfaction.
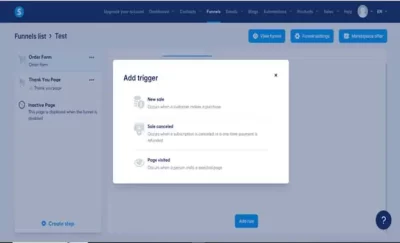
First, you create a “Trigger,” i.e., an event that initiates the process, and then add an “Action,” i.e., the action that follows when the event is triggered.
There are three types of events that can result in a trigger. You’ll see the options once you click the “Add Rule” button. You can trigger an event when a new sale occurs, a page is visited, or a sale is canceled.
After you add the trigger, you have a list of “Actions” to choose from. You can send an email, remove a tag, enroll them in a course, add a tag, and so on.
Let’s take an example to understand this. Suppose you want to automate communication with your customers Let’s use a purchase as a trigger in this example.
As an action, you can make Systeme.io:
- Send an automated “Thank you for shopping with us” email
- And tag them as a customer of that specific product
This way, you know not to include them in marketing emails promoting the product they’ve already bought — which would result in them opting out of your emails.
As you can see, Systeme.io can be used to automate various repetitive processes that usually take up a lot of time, reducing the workload on your team while ensuring customers feel appreciated.
A/B Testing
Evaluate and optimize performance by testing different variations of pages or campaigns.
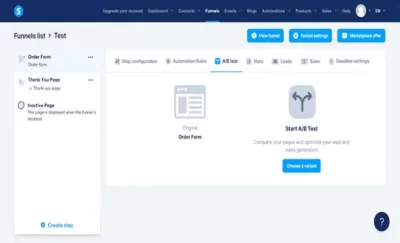
Setting up an A/B test with Systeme.io is pretty simple. Once your product is ready, click on the “Funnels” option to create a new funnel. A/B tests are one of the steps in those funnels.
Then, you’ll choose a variant for the original page and click on “Start A/B Testing”. Let’s take an example. Suppose you’re creating a new course page but aren’t sure what template would work best.
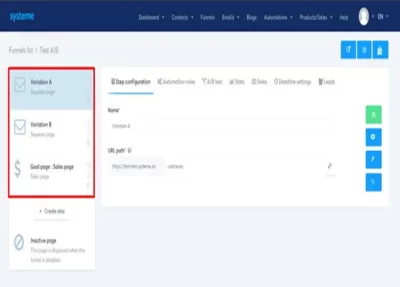
In that case, you can create two pages for the same course. Let’s assume you stick to a classic, clean aesthetic on one page and experiment with colors and visual elements on the other page.
Then, you can run both these pages simultaneously and see which of the two is performing better. Run the test for a week or two, and then pick the best performer to be your final course page.
The benefit of A/B testing is that you’ll know exactly what your customers want. Take the guesswork out of the question — even for something as small as a CTA button — and put them to the test.
Although A/B testing is available even on the free plan, you can only create and launch one test, which is clearly not enough for a business. So, after the first month, it’s better to switch to a paid plan.
Payment Integration
Seamless integration with payment gateways like PayPal and Stripe and Flutterwave offering fee-free transactions.
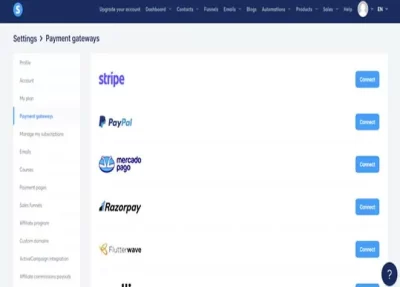
The best part is that if you use PayPal and Stripe to accept online payments from your customers, you won’t have to pay any transaction fee; you can keep 100% of the revenue.
It’s hard to come by tools offering a free plan and still not charging for payments. It gets better with how easy integrating these payment portals with your Systeme.io account is.
For example, if you want to integrate your PayPal account, go to your Systeme.io account > Profile > Settings > Payment Gateways. You’ll then find all the payment options available for integration.
Click on the “Connect” button beside PayPal. Then, enter the API username, password, and signature, and click “Save”.
Team Management
The best thing about Systeme.io is it makes it super easy to manage a whole team and host your entire workspace online, thanks to the assistant accounts.
As the name suggests, you can use these accounts to invite your assistants onboard and add unlimited assistants right from the free plan itself.
You just have to click “Invite” and enter their email address. Within a few minutes, they’ll receive an email with the invitation link to the platform.
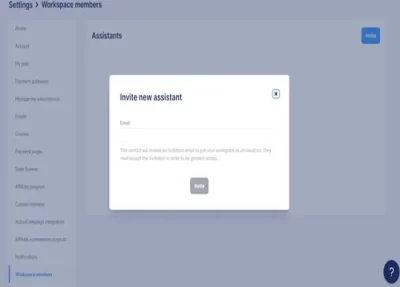
If they have a Systeme.io account, they’ll be automatically redirected to the login page. Otherwise, they’ll be led to the signup page, where they’ll have to register an account.
The assistants will have the same access level as the owner, i.e., you. If you want, you can also give them admin access, which will allow them to invite other assistants on board.
To be more precise, they’ll be able to create sales funnels, emails, newsletters, blogs, automation rules, manage workflows, and create physical products.
However, this unrestricted access isn’t what all businesses would want. Let’s say you want to add an employee to only create blogs but don’t want them dabbling in your sales funnels or emails.
This isn’t possible with Systeme.io, which can prove a risk to safeguarding sensitive business information. We hope to see some more user controls in the near future.
Affiliate Program
Anyone, regardless of your plan, can join the Systeme.io affiliate program. But did you know that you can also create your own affiliate program here?
Affiliate programs are popular marketing technique used by companies to spread the word about their product. And the best part is, there’s no investment upfront.
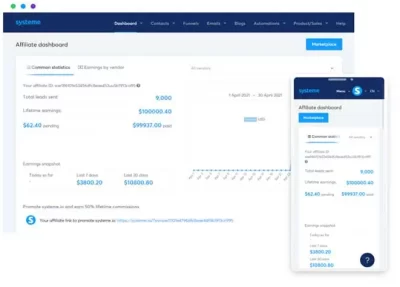
Basically, you’ll hire someone to be an affiliate for you, they’ll spread the word and bring in new customers to your business, and you’ll pay them a percentage of what you’ll get off those customers.
You can use the same default configuration for your program that Systeme.io uses for its own program. Also, remember to create a sales funnel to reach out to more users.
Changing the settings of the program is easy. Just go to the Main Menu > Settings > Affiliate Program settings. Here, you can change the commission rate, payout date, and minimum payout amount.
Order Management
Systeme.io helps you make more money by offering two order management features: Order Bump and Upsell.
Order Bump allows you to add a discount to an existing purchase at checkout, which is a strategy businesses use to increase profits. By offering a discount at the end, customers perceive it as an extra rebate on their purchase, making them more likely to buy high-priced items.
Upselling is another effective technique. It gives you a final opportunity to sell more to a customer. A common example is when ordering food online, like on Uber Eats. They may suggest adding a soda to your order of a burger and fries. The goal is to encourage customers to spend more than they originally planned. By offering complementary products just before checkout, customers often end up adding something small to complete their meal.
Is it Easy to Learn How to Use Systeme.io?
Getting started with Systeme.io is incredibly easy. If this is your first time using the tool, here’s a quick guide on how to get started. First, Click below and go to the official website and create a new account.

You’ll be asked to verify your email, after which you’ll have to log in again.
Once you’re in, the first page that you’ll see is the dashboard. Right now, it’s blank, but once your store is in full swing, you’ll be able to see all the important updates here
How to Create a Blog
If you want to create a new blog. Select the “Blog” option from the top header menu. Then click on “Create” near the top-right corner.
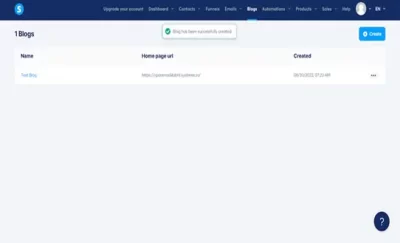
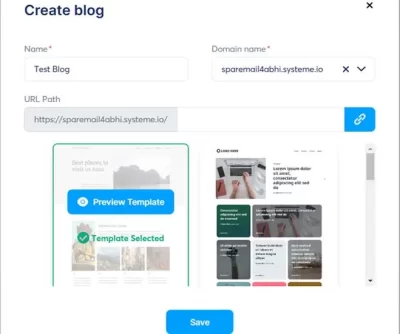
After that, a new window will open where you can enter your blog’s title and domain and choose a template. After the blog is created, you’ll see an entry on the dashboard.
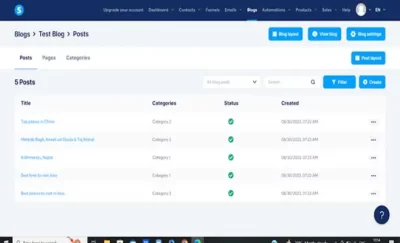
Now, click on the blog title to access the pages and posts, as you can see below in the picture:

From the top options on the right side, you can then change the blog’s visual layout, access its settings, and get a preview through the “View Blog” button before you publish your first post.
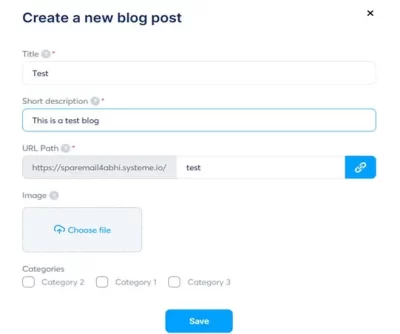
To create a new post, again click on “Create” and fill out the post details such as title, description, URL, and image. You can also create separate categories from your blog here. Once you’re satisfied, click on “Save
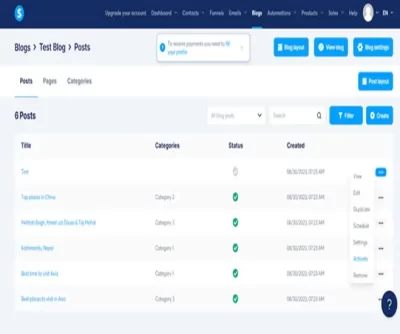
The blog will now show up on the post list along with the sample posts. Click on its name to open and edit it. It’ll look something like this:
You’ll see widgets on the left side of the page, which you can use to decide what elements you want in your post. You can choose to have a content box, a heading, a social share button, or an FAQ section.
The options are fully custom, so choose what you want and simply drag and drop them into place. Once you’re happy with the post, click on “Save Changes.”
Then, return to the page where you have the list of posts. Click on the three dots next to your new post’s name and click “Activate” to publish the post.
Selling a Product
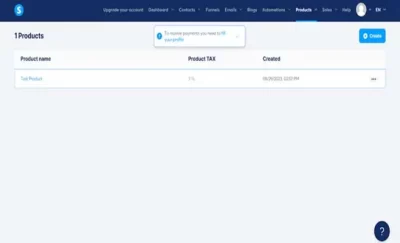
If you want to set up an online store, these are the steps you need to follow. To start with, head to the dashboard and click on the “Products” option from the top header menu.
Now select the type of product you want to sell. It could be a physical product, coupon, course, or anything else. For this guide, we’ve selected physical products.
Now, just like the blog page, you’ll find a button on the top-right corner of the screen that says “Create”. Click on that to add a new product. For this guide, we’ve already created a test product
A new window will open where you can enter product details such as the name, description, tax details, price, and choice of currency.
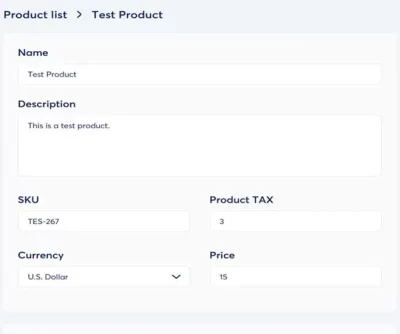
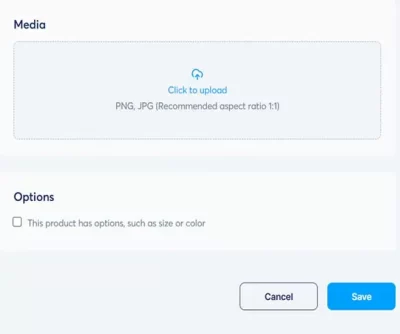
Scroll down a little more, and you’ll find the option to add an image. If this product has multiple options, such as different sizes or colors, check the “Options” box at the end of the page.
Creating a Funnel
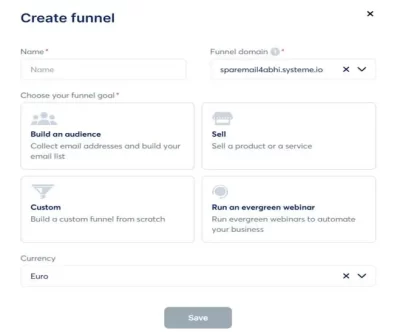
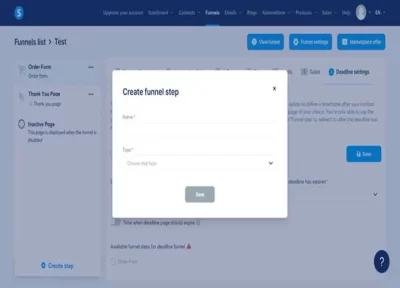
Now that your product is ready, you need a funnel to roll in the customer. Here’s how you’re going to do it. First, select the “Funnels” option from the main menu and click “Create”.
In the next window, enter the funnel name and domain and choose your goal. In this case, our goal is to sell the product we created above. Then choose your currency of choice and hit “Save”.
Now, this is where all the magic begins. First, you need to create a page where the customers will be directed to your product. It could be a pricing page, shopping page, or discount page.
Whichever template you choose, you’ll have to add some extra information, as shown below.
Next, you can add some automation rules if you want. Add a trigger and then add an action that follows it.
Create A/B test
Next, you can create an A/B test where you basically create another variation of the page you created above and then launch them both together to see which one performs better
The next option is “Stats”, which is basically a glimpse into the template that’ll be used to give you insights into your sales and performance.
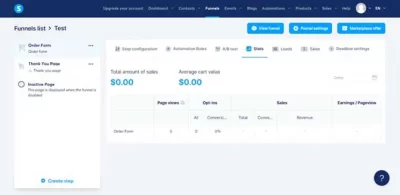
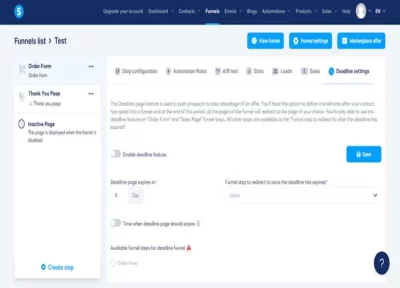
The next two options, i.e., “Leads” and “Sales”, will only work when you actually launch a product and the leads come rolling in, and the last option is “Deadline”.
You can use this feature to offer a limited-time offer on your products. Once the period is over, Systeme will automatically restore the original prices.
These are the steps available by default. But you are more than welcome to create any new step of your choice. Just click the “Create” button on the screen’s bottom-left corner.
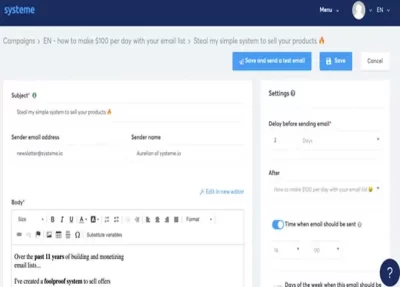
Managing Emails
Whether you want to run an email campaign or send a weekly newsletter to your customers. Here are the steps you need to follow. To start with, click on “Emails” from the top header menu.
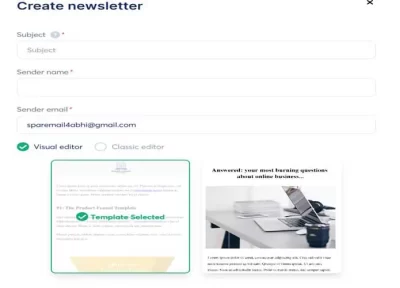
Now, choose what kind of email service you want. For this guide, we’ve selected newsletters. As with creating anything with Systeme.io, on the next page, you’ll find the “Create” option.
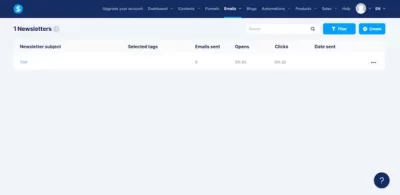
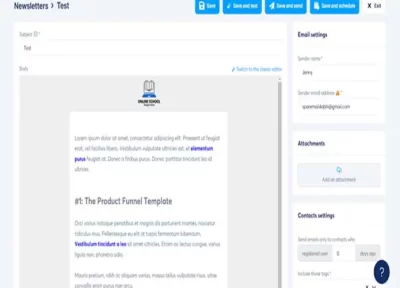
When you click this, a new window will open where you’ll be asked to select an email template and enter the sender name and email ID. Save it, and you’ll see a new email form on the list
Click on the email’s name to open the editor. Type in your email and select the contacts you want to send it to from the menu on the right-hand side. And in just one click, each one of them will receive it.
These are the basic functions of Systeme.io, but there’s a lot more to learn. Thankfully, they have a detailed knowledge base where you’ll find tutorials on using this platform to its full potential.
Why You Can Trust Our Review on Systeme.io
Our reviews are different because we spend a lot of time testing the software ourselves. We also consider feedback from other customers. We looked at various third-party review sites like G2 and TrustPilot to see what Systeme.io users think. We considered the opinions of both new and long-time users to see how the software works over time.
We even tried out the free version of Systeme.io to check out features like Sales Funnels and Email Marketing. We evaluated each feature based on how easy it was to use, how quickly it responded, and what it could do.
We also compared Systeme.io to competitors like ClickFunnels and Hubspot to understand its strengths and weaknesses. While other people’s experiences may be different, we made sure to consider many sources and factors to provide a detailed and clear review that will help most users.