How to Perform Water Borehole Pumping Test
Pumping tests or aquifer performance tests is a field experiment in which a well is pumped at a controlled rate and water-level response (drawdown) is measured in one or more surrounding observation wells and optionally in the pumped well (control well) itself. The way in which the water levels respond to the pumping is then analyzed to derive information about the performance characteristics of the borehole and the hydraulic properties of the aquifer.
The Purpose of Pumping Test
Pumping tests can be undertaken for a wide variety of reasons, including the following:
- To determine the reliable long-term yield (or ‘safe’ yield) of a borehole, and therefore whether or not the borehole can be regarded as a ‘success,’ and how many people it will be able to supply.
- To assess the hydraulic performance of a borehole, usually in terms of its yield-drawdown characteristics. How much drawdown does it take to yield a certain amount of water?
- To derive the hydraulic properties of the aquifer, such as transmissivity and the storage coefficient, or to reveal the presence of any hydraulic boundaries.
- To test the operation of the pumping and monitoring equipment, to make sure that everything is working safely and efficiently, and if applicable, to confirm that the contractors have done their job properly.
- To determine the effects of water abstraction on neighboring abstractions.
- To determine the environmental impact of the abstraction. All groundwater abstraction eventually has an impact; it is only a matter of where, when and whether or not the impact is acceptable.
- To provide information on water quality. Is the water quality suitable for the intended use? Is it stable in the long term? Are there likely to be any problems such as drawing in saline or polluted water after extended periods of pumping?
- To optimize operational pumping regimes (especially from multiple-borehole sources), including selecting the most suitable pumping plant for long-term use, and estimating probable pumping and/or treatment costs.
Preparation for Pumping Test
Before commencing any pumping test, there are certain basic preparations that should be made. These include:
- Information about the borehole or well that is about to be tested.
- The geological characteristics of the subsurface i.e., all those lithological, stratigraphic, and structural features that may influence the flow of groundwater.
- The type of aquifer and confining beds.
- The thickness and lateral extent of the aquifer and confining beds:
- The aquifer may be bounded laterally by barrier boundaries of impermeable material (e.g., the bedrock sides of a buried valley, a fault, or simply lateral changes in the lithology of the aquifer material);
- Any lateral recharge boundaries (e.g., where the aquifer is in direct hydraulic contact with a deeply incised perennial river or canal, a lake, or the ocean) or any horizontal recharge boundaries (e.g., where percolating rain or irrigation water causes the water table of an unconfined aquifer to rise, or where an aquitard leaks and recharges the aquifer);
- Data on the groundwater-flow system: horizontal or vertical flow of groundwater, water table gradients, and regional trends in groundwater levels;
- Any existing wells in the area. From the logs of these wells, it may be possible to derive approximate values of the aquifer’s transmissivity and storativity and their spatial variation
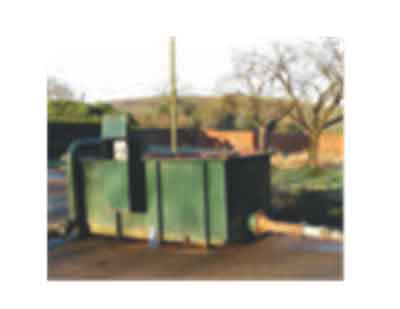
Pumping test equipment
The basic equipment to measure the two parameters in pumping test (water level in the pumped borehole and the rate at which water is being pumped) are as follows:
Measuring Water Level
The most common methods of measuring water level are as follows:
Dipper
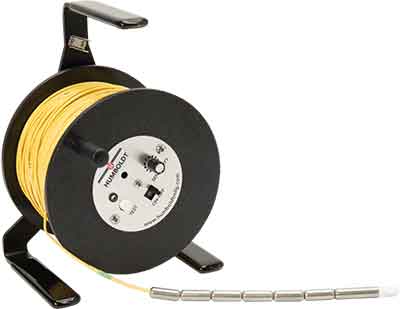
The hand-held water level monitor, commonly known as a “dipper,” or M-scope is the most practical, robust and easily available method of monitoring water levels in boreholes and wells. The dipper probe is lowered down the borehole, and when it reaches the water surface, an electrical circuit is completed and a ‘bleep’ is heard. The water level is then read off a graduated tape in centimeters and should be converted to meters. See fig above.
Pressure Transducer for Water Level Measurement
The transducer is placed in a known position down the borehole (below the water level) and it measures the pressure at that point. This information can be used to deduce the height of the water above that point, and therefore the water level in the borehole.
Transducers (with built-in dataloggers) have an obvious advantage: they can be left unattended for long periods, while still taking frequent water-level readings.
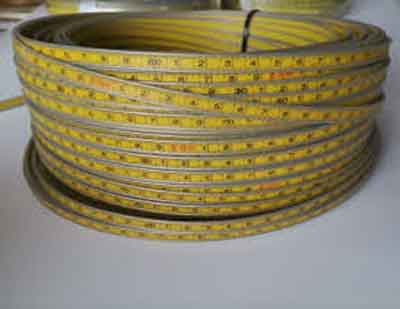
Tape Method
Use this method to measure the depth to the static level in a shallow well. Conduct this test as follows:
Chalk one end of a weighted steel tape with carpenter’s chalk. Lower the tape into the well to a depth of 1 or 2 feet past the chalk. (You can use soluble felt-tip markers as an alternative to chalk.) Measure the wetted length of the tape and subtract the amount from the total length lowered below the reference point to obtain the water depth. This test is accurate to within 0.01 foot.
How to Measure Pumping Rate
The most common method of measuring pumping rate is as follows:
Measured-Container Method
You can determine the flow rate from a well or pump by measuring the time required to fill a container with a known volume. With this method, use small containers for early measurements and large containers for later measurements. Also, use an instrument, such as a stop watch, for accurate time measurements. Use the following equation:
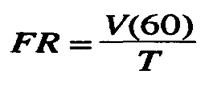
where—
FR = flow rate, in GPM.
V = volume, in gallons.
T = time required to fill container, in seconds.
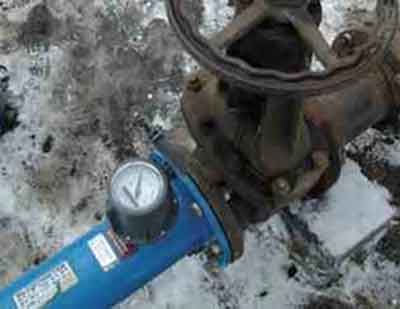
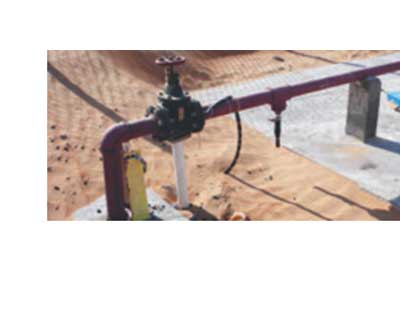
Flow-Meter Method
A turbine-type flow meter will give an acceptable flow-rate reading. This uses spring-loaded pistons that are deflected by the flow of water, and the flow rate is read off the graduated scales.
Weir tanks
A weir tank is a thin-plate ‘V-notch’ gauging weir within a self-contained tank. Weir tanks must be installed exactly level, and there must be an accurate method of measuring the water level inside the tank, plus a conversion table supplied by the tank manufacturer (to convert the water levels into flow rates). See BS ISO 14686:2003 for more information about constructing and using weir tanks.
Alternatively, small weir tanks can be made using local materials, sometimes even a converted oil drum. These weir tanks should be calibrated by an independent flow-measurement method, in order to ensure reliable data. For accurate results, care should be taken to follow design advice (see BS ISO 14686:2003), especially about the thin-plate ‘V-notch’ itself.
Whichever method is used, it is important to measure the pumping rate frequently during the test since it will probably fall as the water level drops, and an average pumping rate needs to be calculated for use in the test analysis.
Types of pumping test
There are different types of pumping test. Three main types of pumping test will be discussed for the purpose of this guidance note, namely: Step test or variable discharge, Constant discharge test and Recovery test.
Step test
The step test (sometimes referred to as the step-drawdown test) is designed to establish the short-term relationship between yield and drawdown for the borehole being tested. It consists of pumping the borehole in a sequence of different pumping rates, for relatively short periods (the whole sequence can usually be completed in a day). There are many different ways to perform a step test, but the most common practice is as follows:
- Start with a low pumping rate, and increase the rate with each successive step, without switching off the pump between steps.
- Aim for four or five steps in total, with the pumping rates roughly spread equally between the minimum and maximum rates.
- All steps should be of the same length in time, with somewhere between 60 and 120 minutes per step being common.
- The pumping rate for the final step should be at or beyond the intended operational pumping rate when the borehole is fully commissioned. Of course, this depends on whether the pump being used for the step test is capable of that pumping rate.
Setting pumping rates
It is advisable to spend time, on the day before the step test itself, experimenting with the valve settings that are necessary to produce the required pumping rates for each step. Manually operated gate or globe valves are commonly used, and these are operated by a screw handle. Fully close the valve, then open it to the fully open position, counting the number of turns of the handle that are made between fully closed and fully open. Experiment with opening the valve different numbers of turns from the fully closed position, to achieve the different pumping rates for the steps, and make a note of the results.
Choosing step length
In practice, the length of each step depends on the number of steps and the total time available for the test (which is usually one day), but 60, 100 or 120 minutes are common step lengths. Ideally, the water level in the borehole will approach equilibrium at the end of each step, but this cannot always be achieved. Even if the water level has not reached equilibrium at the end of each step (in other words, if it is still falling slowly), the results from the test will still be useful. They provide a ‘snapshot’ of borehole performance under certain conditions, and can be compared with the results from the same test (same pumping rates and step length) repeated at another time, to see if the borehole performance has changed. If at the end of the planned time for the first step the water level is still falling quickly, the decision may be taken to extend the length of the step (and extend the length of subsequent steps to match). Further details on the theory and practice of step tests can be found in Clark (1977).
Step-test procedure
Assuming that all the equipment is ready and people have been assigned their tasks, the procedure for conducting a step test is as follows:
- Choose a suitable local datum (such as the top of the casing) from which all water-level readings will be taken, and measure the rest-water level. The water level must be at rest before the start of the test, so the test should not be conducted on a day when the borehole is being drilled or developed, or when the equipment is being tested.
- Open the valve to the setting for the first step (determined by prior experiment, as described above) and switch the pump on, starting the stopwatch at the same time. Do not keep changing the valve setting to achieve a particular pumping rate (a round number in litres per minute, for example). Rather, aim for an approximate rate and measure the actual rate (see 4) below).
- Measure the water level in the borehole every 30 seconds for the first 10 minutes, then every minute until 30 minutes have elapsed, then every 5 minutes until the end of the step (the length of each step having been decided during the test preparations). If you miss the planned time for a water-level reading, write down the actual time the reading was taken. Record all the readings on the standard step-test form.
- Measure the pumping rate soon after the start of the step, and then at intervals during the step (every 15 minutes would be reasonable). If there is a noticeable change in the rate of increase of drawdown or the pump sounds different, then measure the pumping rate at those times as well. If the pumping rate changes significantly (say by more than 10%), then adjust the valve setting to maintain as steady a pumping rate as possible throughout the step. Be careful not to over- adjust and make the problem worse.
- At the end of Step 1, open the valve further, to the setting for Step 2, note the time (or restart the stopwatch) and repeat the procedures for measuring water levels and pumping rates (see 3) and 4) above).
- Repeat the procedure for subsequent steps, progressively increasing the pumping rate for each step.
- At the end of the final step (which will probably be Step 4 or 5), switch the pump off, note the time (or restart the stopwatch), and measure the water-level recovery at the same measurement intervals as for measuring the drawdown in each step. Continue for at least the length of a step, and ideally for much longer, until the water level approaches the pre-test level. See Chapter 6 for a full explanation of the recovery period.
Constant Rate discharge
The constant-rate test is the most common type of pumping test performed, and its concept is very simple:
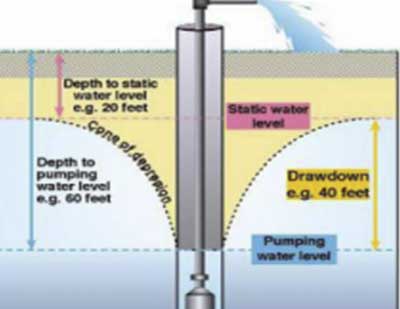
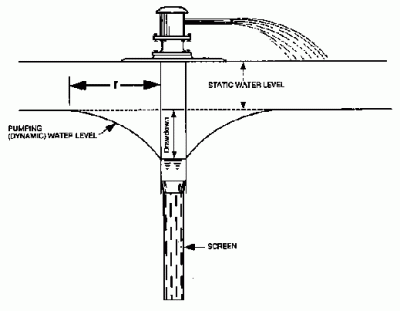
The borehole is pumped at a constant rate for an extended period (from several hours to several days or even weeks) while the water levels and pumping rates are monitored.
If the most value is to be gained from constant-rate tests, water levels should be monitored in an observation borehole as well as in the pumping borehole (or better still, several observation boreholes at different distances from the pumping borehole).
The present guidelines concentrate on what to do with the data obtained from the pumping well alone. Data from constant-rate tests can be analyzed to derive the transmissivity of the aquifer. The storage coefficient of the aquifer can be calculated only if data from observation boreholes are available. (Which is assumed not to be the case here).
Observation wells are necessary in order to determine fully the aquifer properties. Table below gives guidance on the minimum durations that should be allowed for constant discharge tests.
| Discharge rate m3/day | Minimum duration of constant discharge days (of constant 24 h discharge) |
| Up to 500 | 1 |
| 500 to 1 000 | 2 |
| 1 000 to 3 000 | 4 |
| 3 000 to 5 000 | 7 |
| Over 5 000 | 10 |
In certain situations, increases or decreases in these periods will be appropriate. Longer tests would be required for example to adequately assess the influence of boundaries. The effect of a recharge boundary is a slow-down (deceleration) in the rate of drawdown.
Where the recharge source is a specific feature, such as a watercourse or a lake, the time that elapses before the onset of this deceleration will increase in proportion to the square of the distance between the pumping well and the recharge source. Eventually, drawdown will stabilize for the remainder of the test.
If a delayed-yield effect occurs, the development of the time-drawdown relationship will be delayed. It is not possible to estimate accurately in advance the length of this delay unless it has occurred in nearby wells previously tested in the same aquifer. If a delayed yield is expected, an extension of the duration of the test should be considered.
Barrier boundaries have the effect of increasing the rate of drawdown and present a serious constraint on the yield of the well. The shorter periods given in Table below may therefore require extending by one or two days to observe the effects adequately, particularly if they appear towards the end of the period initially specified. (The pumping of another well in the same aquifer will have the same effect as a boundary, if the cones of influence of the two wells intersect).
The two main decisions to make with a constant-rate test are the pumping rate and the length of the test:
Pumping rate
Typically, the chosen pumping rate is equal to the intended operational pumping rate when the borehole is fully commissioned, although some hydrogeologists prefer to set the test pumping rate 25-50% higher than the intended operational pumping rate. Information from a step test is very helpful in deciding this pumping rate.
The chosen rate also depends on how the borehole is going to be operated. Some boreholes are pumped at a high rate to fill up a storage tank or reservoir in a relatively short period, and then the water is used gradually (by gravity) from storage. The pumping rate for the test can either be the actual pumping rate when the pump is switched on, or the average long-term pumping rate (including the operational non-pumping periods). If the focus of the test is on long-term sustainability, then it would be better to use the average pumping rate.
Length of test
Ideally, a constant-rate test should be long enough for the water level to reach or at least approach equilibrium. How long it takes to do this depends on the hydraulic properties of the aquifer. Again, the step-test results will help in understanding how the aquifer responds to pumping. For a small or medium borehole, one or two days should be sufficient, but for a large borehole expected to supply a large population, one or two weeks are common.
Many aquifers behave differently in the wet season compared with the dry season; if possible, constant-rate tests should therefore take place at the relevant time of year. For example, if the borehole is intended as a source of water for critical drought periods, then it should be tested during the dry season, otherwise a false impression will be gained of the aquifer’s performance. Another good reason to conduct a test during a dry period is that the groundwater levels may be influenced by recharge from heavy rainfall, which makes it more difficult to interpret the test results.
Maintaining a steady pumping rate during a constant- rate test is sometimes a problem, especially if the chosen pumping rate results in a large drawdown. This is because for centrifugal pumps (the most commonly used type of pump) there is a relationship between pumping rate and pumping head. Incidentally, the pump must be set at a depth that is several meters below the deepest water level expected during the test.
Constant-rate Test Procedure
Assuming that all the equipment is ready and people have been assigned their tasks, the procedure for conducting a constant-rate test is as follows:
- Choose a suitable local datum (such as the top of the casing) from which all water-level readings will be taken, and measure the rest-water level. The water level must be at rest before the start of the test, so the test should not be conducted on a day when the borehole is being drilled or developed.
- Open the valve to the appropriate setting and switch the pump on, starting the stopwatch at the same time. Do not keep changing the valve setting to achieve a particular pumping rate (a round number in liters per minute, for example). Rather, aim for an approximate rate and measure the actual rate.
- Measure the water level in the borehole every 30 seconds for the first 10 minutes, then every minute until 30 minutes have elapsed, then every 5 minutes until 2 hours have elapsed. After 2 hours, observe how quickly the water level is still falling, and decide an appropriate frequency for water-level readings until the end of the test. If the water level is falling very slowly, then a reading every 30 minutes or even every hour may be sufficient. If the test is to continue for several days, review the measurement frequency depending on the behavior of the water level. If you miss the planned time for a water-level reading, write down the actual time the reading was taken. Record all the readings on the standard form.
- Measure the pumping rate soon after the start of the test, and then at intervals during the test (every 15 minutes would be reasonable for the first few hours, then decide a suitable frequency for the remainder of the test). If there is a noticeable change in the rate of increase of drawdown, or if the pump sounds different, then measure the pumping rate at those times as well. If the pumping rate changes significantly (say by more than 10%), then adjust the valve setting to maintain as steady a pumping rate as possible throughout the test, but be careful not to over-adjust and make the problem worse.
- At the end of the test, switch the pump off, note the time (or restart the stopwatch), and measure the water- level recovery at the same measurement intervals as for measuring the drawdown. Continue until the water level has recovered to the pre-test level, or at least approaches that level. See the next chapter for a full explanation of the recovery period.
If there is a problem during the test, such as an interruption to the power supply or a pump failure, then use your judgement, depending on when the problem occurs and how long it is likely to last. For example, if something goes wrong in the first few minutes, wait for the water level to recover and start again. If the failure occurs well into the test and can be solved quickly, just restart the pump and carry on. If it is going to take a long time to solve, it may be better to allow full recovery of the water level and start again. For long constant-rate tests, it is especially important to ensure that there is an adequate fuel supply to last the planned duration of the test.
Recovery Test
The recovery test is not strictly a pumping test, because it involves monitoring the recovery of the water level after the pump has been switched off in step tests and constant-rate tests. Recovery tests are valuable for several reasons:
- They provide a useful check on the aquifer characteristics derived from pumping tests, for very little extra effort – just extending the monitoring period after the pump has been switched off.
- The start of the test is relatively ‘clean.’ In practice, the start of a constant-rate test, for example, rarely achieves a clean jump from no pumping to the chosen pumping rate. Switching a pump off is usually much easier than starting a pump, and the jump from a constant pumping rate to no pumping can be achieved fairly cleanly.
- Similarly, recovery smooth out small changes in the pumping rate that occurred during the pumping phase, and there is no problem with well losses from turbulent flow. This results in more reliable estimates of aquifer properties when the recovery data are analyzed.
- The water levels in the borehole are easier to measure accurately in the absence of turbulence caused by the pumping (especially in the early stages of the test, when water levels are changing quickly). Some people find that it is easier to take readings quickly with a dipper when the water level is rising than when it is falling.
- Recovery tests represent a good option for testing operational boreholes that have already been pumping at a constant rate for extended periods. In these cases, the recovery test can be performed when the pumps are first switched off, followed by a constant discharge test when the pumps are switched back on again.
Ideally, the duration of the recovery test should be as long as is necessary for the water to return to its original level, which, theoretically, would be as long as the duration of the pumping phase of the test program. In practice, however, the recovery test is often shorter, partly for reasons of cost (keeping equipment and personnel on the site). It should not be too short however, because as described in relation to the constant-rate test, the data from the early part of the test are affected by well storage. If the data from the constant-rate test have been roughly plotted in the field on semi-log graph paper, this will give some idea of the length of time before the data become useful for calculating transmissivity (when they fall on a straight line).
The pump should not be removed from the borehole while the recovery test is taking place, because the sudden removal of the submerged volume of the pump and rising main will cause a sudden change in the water level in the borehole. For a similar reason, there must be a non-return valve (called a foot-valve in this context) at the base of the rising main. In the absence of a foot-valve, when the pump is switched off, the contents of the rising main will flow back down into the borehole and cause a sudden change in the water level in the borehole. Having said that, unless the foot-valve can be opened from the surface, the rising main will be full of water, and therefore heavy, when it is removed from the borehole. Thus, it may not always be practicable to carry out a recovery test.
Recovery Test Procedure
The procedure for undertaking a recovery test is as follows:
- Switch the pump off and start the stopwatch at the same time.
- Measure the water level in the borehole in the same way as for the start of the pumping test, that is, every 30 seconds for the first 10 minutes, then every minute until 30 minutes have elapsed, then every 5 minutes until 2 hours have elapsed. After 2 hours, observe how quickly the water level is still rising, and decide an appropriate frequency for water-level readings until the end of the test. If the water level is rising very slowly, then a reading every 30 minutes or even every hour may be sufficient. If you miss the planned time for a water-level reading, write down the actual time the reading was taken. Record all the readings on the standard form. Make sure the same datum is used for measuring water levels as for the pumping phase.
Talk to us for your upcoming Water Borehole Pumping Test Project
Geodata Evaluation & Drilling LTD. offers water borehole pumping test services. Let us handle the project for you. contact us at www.geodatadrilling.com Phone: +234 8037055441